
|
| This is what the car looked like before the accident |
|

|
| Another view before the accident. |
|

|
| OUCH!! The front end is pretty smashed up. |
|

|
| We've removed everything down to the radiator core support. |
|

|
| Passenger side fender apron is trashed. |
|

|
| The radiator core will absolutely need replacing. |
|

|
| Both fender aprons need replacing. |
|

|
| Another view of the front before we cut out the radiator support. |
|

|
| We've removed the radiator support. Now we can really see all the damage. Amazingly the frame is totally undamaged! |
|

|
| Here we've cut out the drive's side fender apron. |
|

|
| Another view of where the driver's side fender apron used to be. |
|

|
| Now we've removed the passenger side apron too. |
|

|
| We've cleaned up all the remaining metal and primed it with a weld-thru primer. |
|

|
| Another view of the car just about ready for welding. |
|

|
| A view from the passenger side. Hmmm maybe we should paint the eninge while we've got it all apart. |
|

|
| A front view of the engine compartment primed & ready. |
|

|
| A nice coat of Ford Blue on the engine will brighten things up! |
|

|
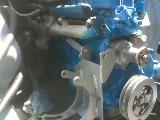
| That block sure does look mighty pretty now! |
|

|
| We decided on a silver "hammered" finish on the harmonic dampener and the water pump. |
|
|
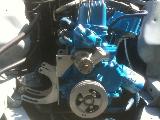
| We put that same hammered finish on the a/c & alternator bracket. |
|
|
| WOW! What a difference a little paint makes!!! |
|

|
| We just welded in a brand new driver's side fender apron. It's starting to look like a car again! |
|

|
| A front view showing how nice the new engine bay is starting to look. |
|

|
| Here's the passenger side fender apron welded in |
|

|
| Next we got the radiator support welded to the new fender aprons |
|
|
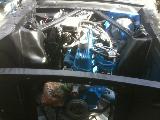
| And we put a nice coat of paint on the entire engine bay - looking good! |
|

|
| Here's a veiw of the battery tray. |
|

|
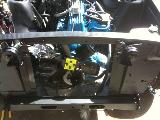
| Here you can see that we routed the wiring inside the fender instead of inside the engine bay. |
|
|
| The horns are in and the engine fan is bolted in place |
|

|
| The Aluminium radiator bolted right in with little difficulty. |
|

|
| The new stock style hood bolted right up. |
|

|
| The passenger fender took a little work, but eventually we got it bolted in perfectly. |
|

|
| See how nice that hood lines up with the fender! |
|

|
| The driver side fender went on without a hitch! |
|

|
| The A/C lines are in and the rest of the engine is very close to complete! |
|

|
| Hood latch installed |
|

|
| View of hood latch & support |
|

|
| Front headlight buckets installed. Also grill temporarily in place. |
|

|
| Stone guard installed, also closer view of headlight bucket. |
|

|
| Driver side stone guard & headlight bucket |
|

|
| Passenger side bumper brackets installed. |
|

|
| Driver's side bumper brackets installed. |
|

|
| Front valence is now on the car! |
|

|
| View of license plate holder in front valence |
|

|
| Driver's side of valence. |
|

|
| Passenger side headlight door installed on bucket. |
|

|
| Driver's side headlight door installed on the bucket. |
|

|
| Wow! What a project. We're FINALLY ready for PAINT!!!!!!! WoooooHooooo! |
|


